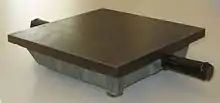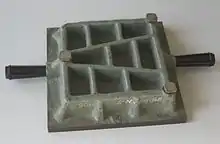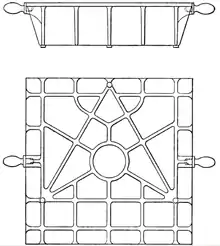

A surface plate is a solid, flat plate used as the main horizontal reference plane for precision inspection, marking out (layout), and tooling setup.[1] The surface plate is often used as the baseline for all measurements to a workpiece, therefore one primary surface is finished extremely flat with tolerances below 11.5 μm or 0.0115 mm per 2960 mm for a grade 0 plate.[2] Surface plates are a common tool in the manufacturing industry and are often fitted with mounting points so that it can be an integrated structural element of a machine such as a coordinate-measuring machine, precision optical assembly, or other high precision scientific & industrial machine. Plates are typically square or rectangular, although they may be cut to any shape.
Accuracy and grade
There are varying grades used to describe the accuracy of some metrology equipment such as: AA, A, B, and Workshop grade. While workshop grade is the least accurate, all grades of surface plates are held to a high degree of flatness.
Surface plates must be calibrated regularly to ensure that chipping, warping, or wear has not occurred. A common problem is wear to particular areas, such as that caused by the frequent use of a tool in one place (such as a height gauge), that causes an uneven surface and reduces overall accuracy of the plate, this may be greatly accelerated if abrasive dust is present. Tools and workpieces may also cause damage when dropped on the surface plate. Also, damage can be caused when swarf and other debris have not been removed. This will result in erroneous measurements. Damage to the plate can be corrected only by resurfacing, which requires specialised techniques and equipment depending on the grade of the plate.
History
Unlike most mechanical precision instruments, surface plates do not derive their precision from more-precise standards. Instead they originate precision by application of the principle of "automatic generation of gages". In this process, three approximately flat surfaces are progressively refined to precise flatness by manually rubbing them against each other in pairs with colouring matter in between, and then hand-scraping the high points. Any errors of flatness are removed by this scraping, since the only stable, mutually conjugate surface shape is a plane.
The importance of the high-precision surface plate was first recognised by Henry Maudslay around 1800. He originated the systems of scraping a cast-iron plate to flatness, rubbing marking blue between pairs of plates to highlight imperfections, and of working plates in sets of three to guarantee flatness by avoiding matching concave and convex pairs.[3]
Joseph Whitworth, born in 1803, had been an apprentice with Maudslay from 1825 but had left by the time he started his own business in 1833. He described this process to the British Association in 1840 in his paper "On producing True Planes or Surfaces on Metals"—as he related during his chairman's address in 1856 at the inaugural meeting of the British Institute of Mechanical Engineers in Glasgow.[4][5] His 1840 paper, and his past work for Maudslay, has led to some writers claiming Whitworth as the originator of the surface plate scraping technique, not Maudslay.[6]
Plate material
Granite
Before the Second World War, metal was the standard material used for surface plates, however, the war efforts of various countries put a strain on the availability of metal. A monument and metal shop owner (Wallace Herman) in Dayton, Ohio, along with his inventive employee Donald V. Porter, started using granite in place of metal for his surface plates. Today most surface plates continue to be made of black granite, more accurately referred to as black diabase, with the more wear-resistant surface plates being made of quartz-bearing granite. The quartz content of these granite surface plates increases the wear resistance of the plate as quartz is a harder stone. Black granite is dominantly used in machine bases, granite accessories, and custom applications for its superior stiffness, excellent vibration damping, and improved machinability. Quartz-bearing granite (usually pink, white, or grey) is often made thicker than black granite to provide equal load-bearing capabilities of the types of material used for surface plates, as it is not as stiff as black granite.
Damage to a granite surface plate will usually result in a chip but does not affect the accuracy of the overall plane. Even though it is chipped, another flat surface can still make contact with the undamaged portion of a chipped surface plate, whereas damage to a cast-iron plate often raises the surrounding material above the working plane causing inspected objects to no longer sit parallel to the surface plate.
Granite is also inherently stable, is non-magnetic, has excellent vibration damping characteristics, and will not rust.
On 3 August 1961, Federal Specification GGG-P-463B was issued to provide requirements in United States customary units for igneous rock (granite) surface plates for use in precision locating layout, and inspection work. It encompassed new certification, recertification in the field, and recertification after resurfacing. GGG-P-463B was later revised and reissued on 12 September 1973 as GGG-P-463C, which provided common language and terms of classification for surface plate manufacturing and commerce. On 15 June 1977 an amendment was issued to the federal specification in order to include requirements in metric units.
Although GGG-P-463C was used extensively in American industry since its publication, the government did not issue any new revisions to keep up with advancements within industry. The American Society of Mechanical Engineers (ASME) decided to form a committee to revise the federal specification in accordance with modern technologies. Most notably, a more complete glossary was added with currently accepted definitions, and a new format was used that should be more familiar to current users of the Standard. ASME also recognised the need for updates to incorporate modern concepts such as traceability and measurement uncertainty that have undergone considerable development since 1973. In June 2013, ASME replaced Fed Spec GGG-P-463C with the American National Standard (ANS) ASME B89.3.7 – 2013 Granite Surface Plates.[7] Iso standard defines ISO8512-2 for granite surface plates, but it seems the current in use is still dating back 1990.[8]
Cast iron

Prior to World War II, almost all surface plates were made from ribbed cast iron with the ribbing used to increase stiffness without incurring the weight of solid construction. The cast iron was aged to reduce stress in the metal in an effort to decrease the likelihood of the plate twisting or warping over time.
Cast-iron surface plates are now frequently used on production floors as a tool for lapping granite surface plates to achieve certain grades of accuracy. The metal allows itself to be impregnated with the lapping media over a large flat surface.
Despite a fall in popularity among machine shops, cast iron remains the most popular material for master surfaces (different use from a surface plates) among laboratory metrologists, machine builders, gauge makers, and other high-accuracy industries that have a requirement for gauging flatness. Cast iron that has been properly cast is more dimensionally and geometrically stable over time than granite or ceramics,[9] is more easily worked to a higher grade of flatness, and provides a better bearing surface to assist the creation of other master standards. These specialized surface plates are produced in sets of three, by the company that will be using them, so the plates may be regularly verified and refined, including by the Whitworth three plate method, without the need to send them out to be reconditioned. Despite its high stability, cast iron remains unsuitable for use as a normal surface plate in high-tolerance production applications because of thermal expansion. The nature and use of a master surface, by contrast, already necessitates expensive measures to control temperature regardless of material choice, and cast iron becomes preferable.
Cast iron, unlike granite, has very uniform optical properties and, unlike glass or ceramic, very small light penetration depth which makes it favorable for certain optical applications.[10]
Glass
Glass is an alternative material and was used during World War II when material and manufacturing capacity were in short supply. Glass can be suitably ground and has the benefit that it chips rather than raising a burr, which is a problem when using gray cast iron.
Accessories
The surface plate is used in conjunction with accessories such as a square, straight edge, gauge blocks, sine bar, sine plate, dial indicator, parallels, angle plate, height gauge, etc.
Calibration of surface plates
Granite surface plate calibration should be performed routinely to maintain proper flatness and ensure measurement accuracy over time. The intervals between calibrations depends on the environment where the surface plate is located. When needed, lapping or resurfacing is provided to bring measurements within grade guidelines. This procedure involves polishing the surface with an abrasive paste to remove all unwanted material. Granite surface plate calibration also includes cleaning and a light polishing.
References
- ↑ Parker, Dana T. Building Victory: Aircraft Manufacturing in the Los Angeles Area in World War II, p. 82, Cypress, CA, 2013. ISBN 978-0-9897906-0-4
- ↑ "ISO 8512-2:1990". ISO.
- ↑ Rolt (1965), pp. 87–88.
- ↑ Whitworth, Joseph (1841). "On producing true planes or surfaces on metals". Notices and Abstracts of Communications to the British Association for the Advancement of Science, at the Glasgow meeting, August 1840. London, England: John Murray. p. 192.
- ↑ Whitworth, Joseph (April 1856). "The Institute of mechanical Engineers in Glasgow: Chairman's address". Practical Mechanics Journal. 2. 1: 173–175. Retrieved 26 October 2011.
- ↑ Rolt (1965), p. 113.
- ↑ B89.3.7 Granite Surface Plates.
- ↑ ISO8512-2 Granite Surface Plates standard has been reviewed and then confirmed in 2012.
- ↑ Moore, Wayne R. (1970). Foundations of Mechanical Accuracy. Moore Special Tool Company. p. 30.
- ↑ "Surface Plate". www.zebraoptical.com.
Bibliography
- Rolt, L.T.C. (1986) [1965]. Tools for the Job. HMSO. ISBN 0112904335.
Further reading
- Reid, David T. (1991). Fundamentals of Tool Design (3rd ed.). Dearborn, Michigan: Society of Manufacturing Engineers. ISBN 0-87263-412-4.
External links
 Media related to Surface plates at Wikimedia Commons
- Two surface plates made by Whitworth
- "Granite Surface Plates". L.S. Starrett Company. Retrieved 2012-01-27.
- "Frequently Asked Questions". L.S. Starrett Company. Retrieved 2007-02-15.